1. Chiyambi ndi Kupitiliraview
This manual provides detailed instructions for the installation, operation, maintenance, and troubleshooting of the ASRock 760GM-HDV Rev: 1.01 Desktop Motherboard. This motherboard is designed for AMD AM3/AM3+ processors and supports DDR3 memory, offering a reliable foundation for personal computer systems.
Key features include an AMD 760G/SB710 chipset, support for up to 32GB DDR3 RAM, and integrated graphics with HDMI, VGA, and DVI outputs. It also provides USB and SATA 3GB/s connectivity.
2. Kukhazikitsa ndi Kuyika
Before beginning installation, ensure your workspace is clean, well-lit, and static-free. Always handle the motherboard by its edges and use an anti-static wrist strap to prevent electrostatic discharge (ESD) damage.
2.1 Makhalidwe a Maboardboard
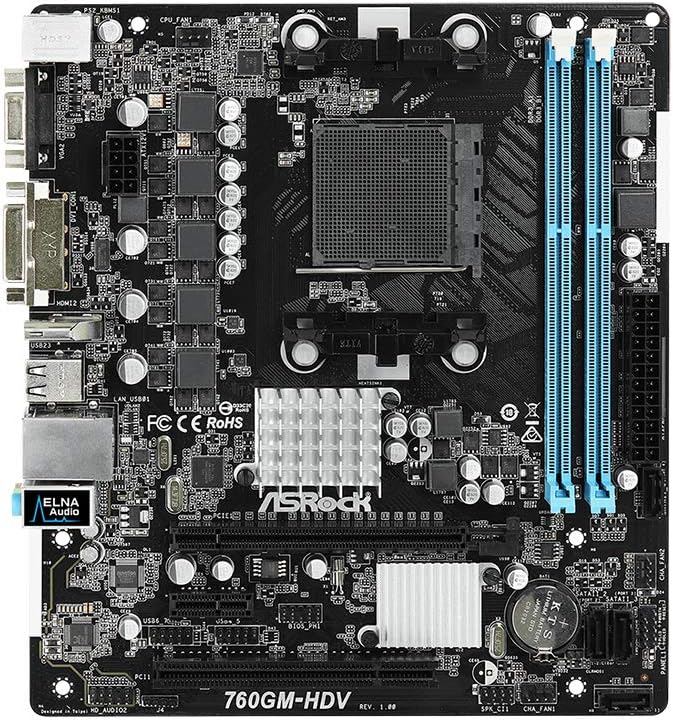
Chithunzi 1: Pamwamba view of the ASRock 760GM-HDV motherboard, showing the CPU socket, RAM slots, PCIe slots, and various connectors.
2.2 Njira Zokhazikitsira Zigawo
- Konzani Mlanduwu: Install the I/O shield into the rear opening of your computer case. Ensure standoffs are correctly aligned and installed for the Micro ATX form factor.
- Ikani CPU: Open the CPU socket lever. Carefully align your AMD AM3/AM3+ processor with the socket, ensuring the golden triangle on the CPU matches the triangle on the socket. Gently place the CPU into the socket without force. Close the lever to secure the CPU.
- Ikani CPU Cooler: Apply thermal paste to the CPU (if not pre-applied on the cooler). Mount the CPU cooler according to its manufacturer's instructions, ensuring it is securely fastened and the fan cable is connected to the CPU_FAN header on the motherboard.
- Ikani RAM: Open the clips on both ends of the DDR3 DIMM slots. Align the memory module's notch with the slot's key. Press down firmly on both ends of the module until the clips snap into place. This motherboard supports dual-channel DDR3 memory.
- Ikani Bolodi Yaikulu: Ikani bolodi la amayi mosamala m'bokosilo, ndikulumikiza mabowo a zomangira ndi zomangira. Mangani bolodi la amayi ndi zomangira.
- Lumikizani Power Supply: Connect the 24-pin ATX power connector and the 4-pin ATX 12V power connector from your power supply to the corresponding ports on the motherboard.
- Lumikizani Zipangizo Zosungira: Connect SATA data cables from your hard drives or SSDs to the SATA 3GB/s ports on the motherboard. Connect power cables from the power supply to your storage devices.
- Lumikizani Zingwe Zakutsogolo: Connect the power button, reset button, HDD LED, power LED, and front USB/audio headers from your case to the corresponding pins on the motherboard. Refer to the motherboard's silkscreen labels for correct orientation.
- Ikani Makhadi Okulitsa: If using a dedicated graphics card or other PCIe expansion cards, insert them into the appropriate PCIe slots and secure them with the case's retention mechanism.
3. Malangizo Ogwiritsira Ntchito
3.1 Initial Power-On and BIOS Access
- After all components are installed and connected, connect your monitor, keyboard, and mouse to the appropriate ports.
- Yatsani makina anu. Mukayamba kuyambitsa, dinani mobwerezabwereza DEL or F2 kiyi yolowera mu BIOS/UEFI setup utility.
- In the BIOS, you can configure boot order, system time, and various hardware settings. Save changes before exiting.
3.2 Kulumikiza Zozungulira
The ASRock 760GM-HDV motherboard offers a range of rear I/O ports for connecting external devices:

Chithunzi 2: Rear I/O panel of the ASRock 760GM-HDV motherboard, showing PS/2, VGA, DVI, HDMI, USB, LAN, and audio ports.
- Madoko a PS/2: For connecting legacy PS/2 keyboards and mice.
- VGA, DVI, HDMI Ports: For connecting displays. Use one port at a time for integrated graphics output.
- Madoko a USB: For connecting USB devices such as keyboards, mice, external drives, and printers.
- LAN Port: For connecting to a wired network using an Ethernet cable.
- Audio Jacks: For connecting speakers, headphones, and microphones.
3.3 Kuyika Madalaivala
After installing your operating system, install the necessary drivers for the motherboard's chipset, integrated graphics, audio, and LAN. These drivers are typically provided on a support CD or can be downloaded from the ASRock official webtsamba la chitsanzo chanu.
4. Kusamalira
- Kuyeretsa Fumbi: Regularly clean dust from inside your computer case, especially around the CPU cooler, chipset heatsink, and fan vents. Use compressed air and ensure the system is powered off and unplugged.
- Zosintha za BIOS: Nthawi ndi nthawi onani ASRock website for BIOS updates. BIOS updates can improve system stability, compatibility, and performance. Follow the update instructions carefully to avoid system damage.
- Kuwunika kwamagulu: Ensure all cables are securely connected and no components are loose. Check for any signs of physical damage or overheating.
5. Mavuto
- Palibe Mphamvu/Palibe POST:
- Verify all power cables (24-pin ATX, 4-pin 12V) are securely connected.
- Onetsetsani kuti CPU ndi RAM zili bwino.
- Yesani kuyambitsa ndi zinthu zofunika zokha (CPU, ndodo imodzi ya RAM, GPU ngati palibe zithunzi zophatikizidwa).
- Clear CMOS by removing the CMOS battery for a few minutes or using the clear CMOS jumper.
- Palibe Chiwonetsero:
- Ensure the monitor is connected to the correct video output (motherboard's integrated graphics or a dedicated graphics card).
- Check monitor power and input selection.
- If using a dedicated graphics card, ensure it is properly seated and has power.
- Dongosolo Logwiritsira Ntchito Silikuyamba:
- Check boot order in BIOS to ensure the correct drive is selected.
- Verify SATA data and power connections to the boot drive.
- Run a diagnostic check on the storage drive.
6. Zofotokozera
| Mbali | Kufotokozera |
|---|---|
| Wopanga | ASRock |
| Nambala ya Model | 760GM-HDV |
| Chipset Type | AMD 760G / SB710 |
| CPU Socket | AM3 / AM3+ |
| Ma processor Ogwirizana | AMD Athlon, AMD Sempron (AM3/AM3+ series) |
| RAM Memory Technology | DDR3 |
| Kukula Kwambiri kwa Memory ya RAM | 32 GB |
| Memory Clock Speed | Kufikira 3400 MHz (OC) |
| Integrated Graphics | AMD Radeon HD 3000 (on 760G chipset) |
| Madoko Otulutsa Kanema | VGA, DVI, HDMI |
| Zithunzi za SATA | SATA 3GB/s |
| Madoko a USB | USB 2.0 (rear and internal headers) |
| LAN | Gigabit LAN |
| Fomu Factor | Mtengo wa Micro ATX |
| Cholumikizira Mphamvu chachikulu | ATX ya ma pin 24 |
| CPU Power cholumikizira | 4-pin ATX 12V |
7. Chitsimikizo ndi Thandizo
For detailed warranty information, please refer to the warranty card included with your product or visit the official ASRock website. ASRock provides technical support for its products. For assistance, please visit the ASRock support page or contact their customer service department.
ASRock Yovomerezeka Webtsamba: www.asrock.com


