1. Mawu Oyamba
This manual provides detailed instructions for the installation, operation, and maintenance of the SINOTIMER TM919A-2 LCD Digital Programmable Timer Switch. This device is designed for automatic control of electrical appliances based on programmed time schedules, offering daily and weekly programming options.
2. Zinthu Zogulitsa
- Weekly 7-day programmable digital time switch.
- Magulu angapotage options (5V, 12V, 24V, 110V, 220V, 85-265V). This specific model is 220V.
- Detachable battery design for backup power.
- 35mm DIN rail mounting for easy installation.
- LCD display for clear time and program viewndi.
- 16 ON/OFF programs per day or week.
- Ntchito yosintha ndi manja.
- High capacity 16A switching contact.
3. Zambiri Zachitetezo
WARNING: Risk of electric shock. Installation should only be performed by a qualified electrician or competent person.
- Onetsetsani kuti magetsi achotsedwa musanayike kapena kukonza.
- Do not exceed the maximum load capacity of 16A.
- Tsimikizirani voliyumu yolondolatage supply for the specific model (220V for TM919A-2).
- Sungani chipangizocho kutali ndi chinyezi ndi kutentha kwambiri.
4. Zamalonda Zathaview ndi Components
The SINOTIMER TM919A-2 features an LCD display, control buttons, and wiring terminals for power input and load control.

Chithunzi 4.1: Patsogolo view of the SINOTIMER TM919A-2 Digital Timer Switch, showing the LCD display, control buttons (P, D+, H+, M+, RESET, MANUAL), and wiring terminals.

Chithunzi 4.2: The timer switch with its transparent protective cover opened, revealing the control buttons for programming and manual operation.
Mabatani Owongolera:
- P (Pulogalamu): Enters program setting mode.
- D+ (Day): Adjusts day of the week or program day.
- H+ (Hour): Adjusts hour or program hour.
- M+ (Minute): Adjusts minute or program minute.
- SITANI: Imakonzanso zoikidwiratu zonse kukhala zolakwika pakampani.
- NJIRA: Toggles output ON/AUTO/OFF.
5. Kukhazikitsa ndi Kuyika
5.1 Chiwonetsero cha Wiring
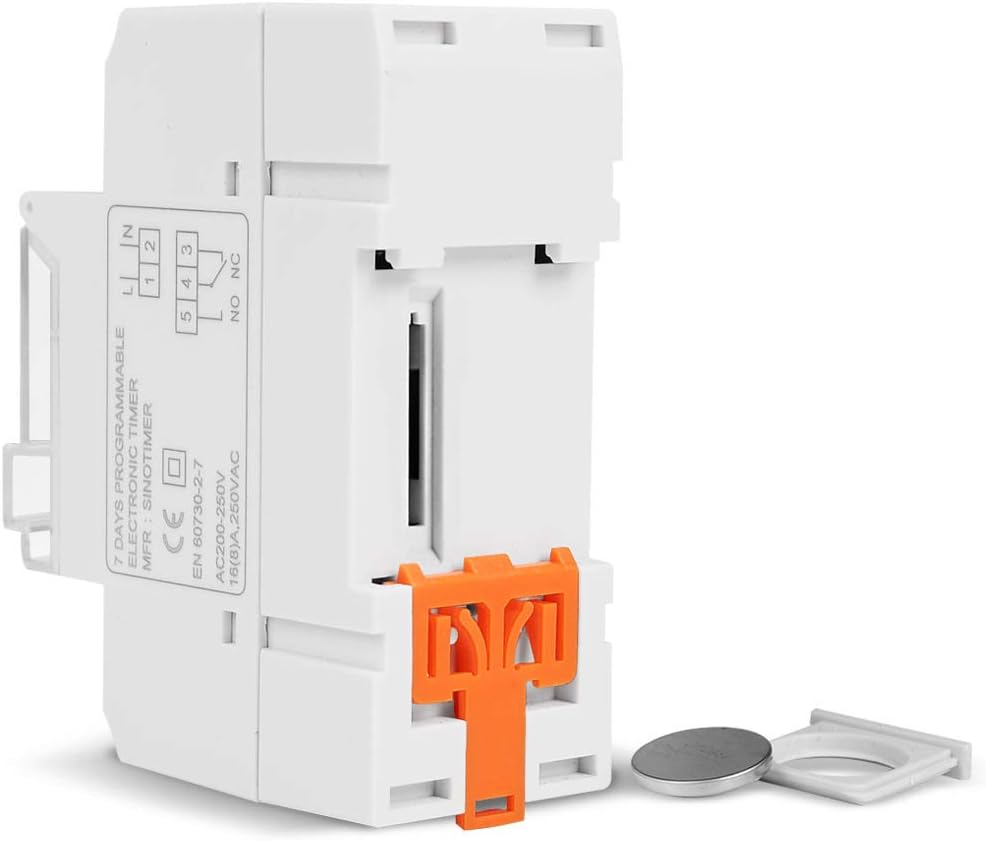
Refer to the wiring diagram on the side of the device and the illustration below for correct connection. Ensure all connections are secure.

Chithunzi 5.1: Mbali view of the timer switch displaying the wiring diagram. Terminals 1 and 2 are for power input (L and N). Terminals 3, 4, and 5 are for the relay output (Common, Normally Open, Normally Closed).
- Terminals 1 & 2 (L, N): Connect to the main power supply (220V AC for this model).
- Terminal 3 (NO - Normally Open): Connects to the load when the timer is ON.
- Terminal 4 (COM - Common): Connects to one side of the load and the power supply.
- Terminal 5 (NC - Normally Closed): Connects to the load when the timer is OFF (less common for typical applications).
5.2 Initial Power-up and Reset
Upon first power-up or after a long period without power, the LCD display may be blank. The internal battery provides backup for settings. If the display is unresponsive or shows garbled characters, press the Bwezeraninso button using a pointed object (e.g., a pen tip). This will clear all settings and restore the timer to its default state.
5.3 Kukhazikitsa Nthawi ndi Tsiku Latsopano
- Dinani pa P button once. The display will show the current time setting.
- Press D+ kukhazikitsa tsiku lomwe lilipo la sabata.
- Press H+ kukhazikitsa ola lamakono.
- Press M+ kukhazikitsa miniti yomwe ilipo.
- Dinani pa P button again to exit time setting mode and return to normal operation.
6. Malangizo Ogwiritsira Ntchito
6.1 Programming ON/OFF Cycles
Chowerengera nthawi chimathandizira mapulogalamu okwana 16 a ON/OFF. Pulogalamu iliyonse imakhala ndi nthawi ya ON ndi nthawi ya OFF.
- Dinani pa P button repeatedly until "1 ON" appears on the display. This is the first ON program.
- Press D+ kusankha masiku a pulogalamuyi. Zosankha zikuphatikizapo masiku osiyanasiyana, masiku a sabata, kumapeto kwa sabata, kapena masiku onse 7.
- Press H+ to set the desired hour for the "ON" event.
- Press M+ to set the desired minute for the "ON" event.
- Press P again. "1 OFF" will appear. This is the first OFF program.
- Repeat steps 2-4 to set the day(s), hour, and minute for the "OFF" event.
- Pitirizani kukanikiza P to cycle through "2 ON", "2 OFF", up to "16 ON", "16 OFF". If you do not need all 16 programs, simply press P until the display returns to the current time.
- To save and exit programming mode, press the P button until the current time is displayed.
6.2 Kuwongolera pamanja
The MAWU button allows you to override the programmed settings temporarily or permanently.
- Press MAWU once: Toggles between ON/AUTO/OFF modes.
- YAYATSA: The output is continuously ON, ignoring programs.
- KUZIMA: The output is continuously OFF, ignoring programs.
- ZOTHANDIZA: The timer operates according to the programmed ON/OFF cycles. This is the standard operating mode.
7. Kusamalira
7.1 Kusintha kwa Battery
The timer includes a detachable CR2032 lithium battery to maintain time and program settings during power outages. If the display becomes dim or resets frequently, the battery may need replacement.

Chithunzi 7.1: The timer switch shown with its battery compartment open and a CR2032 lithium battery, indicating the detachable battery design.
- Disconnect power to the timer before attempting battery replacement.
- Locate the battery compartment, typically on the side or back of the unit.
- Chotsani batire yakale ya CR2032 mosamala.
- Ikani batire yatsopano ya CR2032, kuonetsetsa kuti polarity ndi yolondola (+ mbali mmwamba).
- Tsekani chipinda cha batri.
- Reconnect power and reset the current time and day if necessary.
8. Mavuto
- Chiwonetsero chilibe kanthu:
- Check power supply connections (Terminals 1 & 2).
- Ensure the internal battery is charged or replaced if old.
- Dinani pa Bwezeraninso batani.
- Mapulogalamu sakuyenda:
- Onetsetsani kuti nthawi yalowa AUTO mode (check the display for "AUTO"). Press MAWU kuzungulira modes.
- Verify that the current time and day are set correctly.
- Check that the ON/OFF programs are correctly entered and enabled for the desired days.
- Confirm wiring to the load (Terminals 3, 4, 5) is correct.
- Timer resets unexpectedly:
- The internal battery may be low or depleted. Replace the CR2032 battery.
- Ensure stable power supply to the unit.
9. Zofotokozera
| Mbali | Kufotokozera |
|---|---|
| Chitsanzo | TM919A-2 |
| Magetsi | 220V AC (as per model) |
| Kugwiritsa Ntchito Mphamvu | 4.5 VA (MAX) |
| Kutentha Kusiyanasiyana | -20°C mpaka +50°C |
| Onetsani | LCD |
| Switching Contact | 1 kusintha kusintha |
| Mapulogalamu | 16 ON/OFF per day or week |
| Hysteresis | 2 sec/day (at 25°C) |
| Mphamvu | 16A |
| Mtundu wa Timer | Mphindi 1 mpaka maola 168 |
| Nthawi Yocheperako | 1 miniti |
| Black-out Memory | 60 days (with internal battery) |
| Kulemera kwa chinthu | 0.15kg (5.3 ounces) |
| Kukwera | 35mm DIN Rail |
| Kukula kwa Screen | 1.2 inchi |
Chithunzi 9.1: Dimensional drawing of the SINOTIMER TM919A-2, showing measurements in centimeters for height, width, and depth.
10. Chitsimikizo ndi Thandizo
Specific warranty information for the SINOTIMER TM919A-2 is not provided in the product details. For warranty claims or technical support, please contact your retailer or the manufacturer directly. Keep your purchase receipt as proof of purchase.